A good hand plane is a staple among woodworkers in order to flatten and square-up boards. Although, buying one new can cost several hundred dollars. Yet, vintage hand planes like the Stanley Bailey #5, Stanley Bailey #7, and Stanley Bailey #4 (typically used in that order) can be purchased used and restored relatively easily, and cheaply. Many would argue that these vintage hand planes are better quality than most newer counterparts.
Restoring a hand plane involves removing rust, cleaning and polishing the metal components, and sharpening the iron. Depending on the state of the japanning on the cast iron components, you may decide to paint the body and frog as well. Note that japanning is a type of lacquer finish used on cast iron to prevent rust.

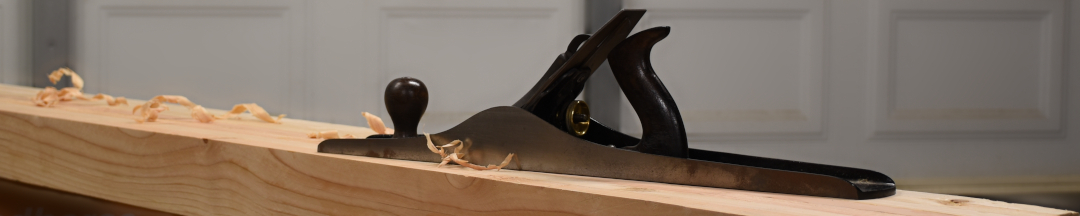
Start the restoration process by disassembling the plane and cleaning the parts. Although hand planes are not that complex, take note of how the pieces are assembled. Refer to the diagram above to identify the main pieces of the hand plane. You can even take pictures for a reminder during reassembly. You will want to separate the metal components for rust removal, and set the wooden knob and tote aside to be refinished if desired.
There are several ways to remove rust from the metal components. If the rust is minimal, it can simply be brushed off with a wire brush, or sanded. If the rust is a bit heavier, an angle grinder can be used. However, it is easier to soak the rusted parts in rust remover, or in distilled white vinegar. Most vintage hand planes will likely benefit from soaking for several hours or overnight. When you remove the items from the liquid of choice, wipe it off with a rag and use a wire brush to finish removing any remaining corrosion. Then clean it with some soap and water to remove any residual rust remover, rinse it off, and thoroughly dry it.
Be cautious of the threads when soaking the cast iron body in rust remover or vinegar. If the threads are very rusty, it is possible to dissolve some of the threads making it more difficult to reattach the handles and the frog. If this happens to you, it is best to re-tap the hole one size up. Several vintage Stanley Bailey hand planes use 12-20 and 9/32-24 threads. Therefore, you'll want to re-tap the holes as 1/4-20 or 5/16-18 accordingly. To re-tap a stripped threaded hole, carefully drill out the threads with the appropriately size drill bit. This will be either a #7 drill bit for 1/4-20 threads, or an F drill bit for 5/16-18 threads. Then, use a 1/4-20 bottoming tap or a 5/16-18 bottoming tap to cut the new threads. You can also purchase sets that include both the tap and the appropriate drill bit: 1/4-20 set or 5/16-18 set.
If you are retapping the hole in the frog for the lever cap screw, note that the head of a 5/16” bolt likely won't fit through the slot in the iron and the lever cap. So, the bolt head may need to be ground down by placing the bolt in a drill and grinding the head down with some sandpaper. This sounds more difficult then it actually is, but it might take some time to get the size right. The picture below of the restored jack plane had this problem. If you look at the lever cap screw you'll notice that it is a hex drive screw which has been ground down.
Now that the rust is removed and any damaged threads are repaired, you can decide if you want to refinish the plane body and the handles. Hand planes are sometimes collected as antique tools, so often times the japanning on the plane body and finish on the handles are left alone in order to keep them original. However, as woodworkers these planes are meant to be used. So, some good quality oil-based enamel spray paint will help prevent rust on the plane body. Just be sure to cover any areas where the iron sits on the frog, and the frog sits on the plane body. These points need to be flat and bare metal. Additionally, refinishing the handles by sanding them down and applying some boiled linseed oil and paste wax will keep them in good condition.
Next, the sole of the plane needs to be sanded flat. This is important for proper performance of the plane. If you are restoring a #5 jack plane, then it doesn't need to be perfectly flat as this tool is typically used for rough stock removal. However, a #7 jointer plane, and a #4 smoothing plane should be very flat. To do this, stick some 80 grit sandpaper to a flat surface like some float glass, melamine, or MDF. 3M Super 77 works well to hold the sandpaper down. Then, reassemble the plane with the iron fully retracted, but installed to keep pressure on the assembly. Now lap the sole of the plane over the sandpaper. Repeat the process until the plane is flat. This may take some time depending on the condition of the plane. You can tell which areas have been flattened simply by looking for shinny new metal across the bottom of the plane body. You can then repeat this process with some 120 grit sandpaper. However, there's no need to go any higher then that. You may decide to flatten the sides of the plane body as well, and you will need to sand off any burrs.

The last step will be to sharpen the blade. However, this is a topic in and of itself. So, it's best saved for a separate post.
